Life & Technology

Handful lessons in different areas of technology and life in general.

Make Your Online Presence Be Known

Just sharing you this awesome and wonderful idea online – http://about.me . Make your online profile be known for others to see.

Your Benefits:
• It’s your business card online
• No need to talk, your online profile is your portfolio
• Career highlights – good for potential employer seeking candidates
• No matter what you do professionally, you will feel at home here
• Empower your online presence
• Delight your friends, colleagues and family
• Making proud of your achievements
• Increase your network and potential clients.

So there it is, all you have to do now is go to their site and start gaining these benefits!

Start registering yourself now and make your online presence be known!

Telerik’s JustCode AddIn for Visual Studio

I just received an email from Telerik stating that I was one of the lucky first 500 people to submit an email to decompiler@telerik.com. And with this, Telerik gave me a $249 worth of product for FREE with Subscription and Priority Support.

So now, I will be enjoying using this wonderful JustCode addin tool for Visual Studio 2010!

From Telerik’s website:

Visual Studio Productivity Plug-in with Real Time Code Analysis

JustCode is an agile development add-in for Visual Studio 2005, 2008 and 2010 that enhances .NET development productivity by providing blazing fast solution-wide, on-the-fly code analysis and error checking, smart code navigation, and refactoring features as well as a Unit Test Runner. With a cross-language engine, JustCode provides features for C#, VB.NET, ASP.NET, XAML, JavaScript and HTML and supports multi-language solutions.


Thank you, Telerik!

Smug Appventures – There’s An App for That!

Together with my good friend, Dennis, we have set-up our website named Smug Appventures that will focus on the following ideas:

  • Mobile related and technology news including but not limited to iOS and Android
  • Showcase of FREE apps created by our fellow Filipinos
  • Developer article posting encourages other Pinoy devs to participate and share their insights.
  • Home grown applications under Smug Appventures.
  • Continuous improvements on the site itself.
    With this, you will see some of my posts here to appear on our site as well.
    If you know or would like to participate on this adventure, please drop us a line or just send us a tweet. Share your passion with us and let us both grow!

iOS: Parsing XML file using APXML Library

Recently, I just got the chance to work on an assignment that requires me to read XML file from the internet and display the fetch data on a simple UITableView. And to be honest, this is the first time I am parsing an XML documents as I am more familiar with the JSON format instead and JSON is fairly simple to work with on an iOS project using the great json-framework open-source library.

There are plenty of resources out there that will do the job very quickly and easily but I opted to try the clean and simple open-source library APXML that does exactly what I like to do – to parse an XML file with minimal effort.

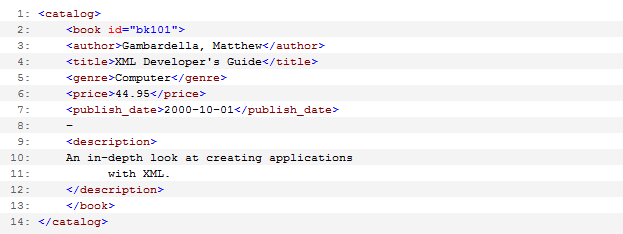
First of all, I need to create a sample XML file which can be found here. This XML file  holds sample books with its title, price, authors and description on every node and has a single attribute that holds the bookId.

Content of our sample books.xml is like this:

01

Reading the XML file and place it in my NSString is pretty straightforward:

02

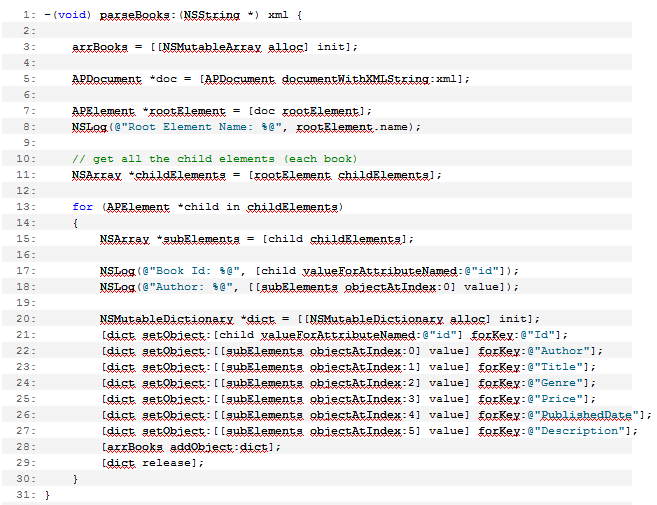
For simplicity, I just use ASCII encoding on line 6 but you can quickly change it to UTF if you need to. Just for the demo, this approach loads the XML synchronously and will block the main thread until the XML file has been loaded. And on line 11 is a private method that will call the APXML library to perform the actual parsing of the XML file like this:

03

With the above code, APDocument initializes with the given XML string and calls its rootElement to determine the root value which is the <catalog> in order tor the parser to determine the object for which it can get all the childElements under it. Child elements is an NSArray of APElement which we can iterate until the last <book> node is read.

APXML library gives you simple method call to get the attribute name:

   1: [child valueForAttributeNamed:@"id"]

Or getting the value of each element in a given node (<book>):

   1: NSLog(@"Author: %@", [[subElements objectAtIndex:0] value]);

After the method parseBooks has been executed, the usual UITableView will fill-up all the books from our dictionary:

04

And if you click on each cell, we can display the details of the book with our UIAlertView:

05

The output of our test project is something like below:

xml_21  xml_22

Haven’t tried other XML libraries for iOS yet, but I’m sure APXML will do most of the job on parsing XML file. You could try this cool library also!

HDD Signature Collision Error on two 1TB WD-SE Passport Fixed

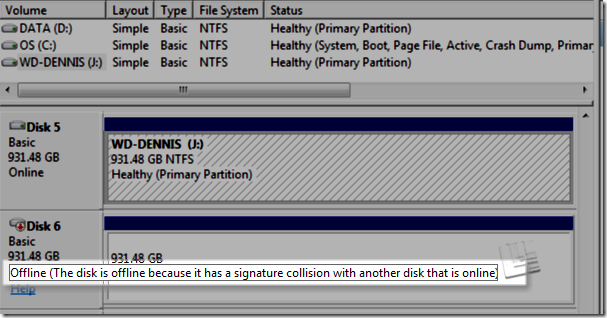
When you attach two (or maybe more) external storage devices like the WD Passport on your Windows 7 machine and you notice that only one drive is working or currently visible on your WIndows Explorer, first DON’T PANIC!Chances are you’re having a so called HDD Signature Collision error which you can only be seen by looking at your Device Management console:

wd_error_01

The quick fix on this is to simply right click-click the Offline disk and select Online. Your other external storage will become visible now on your Windows Explorer.

wd_error_online

Sweet and simple solution.

MyBusyBee TextBlast Security Flawed

This week, I did install this software from their website as they provide a downloadable package with varying types (Basic to Enterprise) and with varying prices. So, I installed the Enterprise version of the product and see how the software works.

And upon launching, I determined that they’re using an “offline” activation which means all the activation logic resides on the program. And here’s what I discovered:

  • Serial number field is based on machine’s hard disk which is why the activation key will only work on the specified/given serial number.
  • Activation key is just based on partial data of the serial number, the license type (Date duration or Unlimited) and the date of activation.
  • After decryption of the activation key, it just simply validates if the given string is equal to “UnLimited” or a given string date. If the given string is “UnLimited”, end of story, no further validation will be checked and your copy of this software is yours perpetually without having to renew your activatin key each month which is exactly what you’re paying for based on your package type (Enterprise cost is Php 5000.00).
  • Embedding password for your MS Access database is not security at all.
  • Encryption and decryption both happening within the program and this is not a good practice of security unless the process of decrypting is not a simple one (sort of having a looping algorithm that will actually translates to the actual string).

And with these discoveries, it just a matter of minutes and my downloaded version of the product is now licensed for a lifetime.

busybee_fullversion

I hope developer/s of this software should carefully examine how best to protect their software so that their customers will always feel that the money they are paying for is worth to the product they are using.

iPhone: NSDate as Double and vice versa

If you’re parsing JSON result from a webservice that returns date as double value and you like to display the human readable date formatted NSDate, one possible method we could achieve this is by using NSDate dateWithTimeIntervalSince1970. As our example below, we like to convert the value of “exp” from Double and vice versa.

SNAGHTML39fdbf

Parsing this in Objective-C is pretty straightforward and you only need NSDate class for the conversion.

Xcode

And when we run it via SImulator, we can see similar result here:

iPhone Simulator

Simple and useful.

Reference: NSDate Class Reference

iPhone: Memorize the Rules

This rule is taken on the book titled Creating iPhone Application with Cocoa Touch and like to share this wisdom with others:

Longtime Cocoa programmers will cite the following rules, originally written by Don Yacktman, whenever you ask a question about how tomanage memory:

• If you allocated, copied, or retained an object, then you’re responsible for releasing the object with either –release or –autorelease when you no longer need the object. If you did not allocate, copy,or retain an object, then you should not release it.

• When you receive an object (as the result of a method call), it will normally remain valid until the end of your method, and the object can be safely returned as a result of your method. If you need theobject to live longer than this—for example, if you plan to store itin an instance variable—then you must either –retain or –copy theobject.

• Use –autorelease rather than –release when you want to return an object but also wish to relinquish ownership of the same. Use –release wherever you can, for performance reasons.

• Use –retain and –release (or –autorelease) when you want toprevent an object from being destroyed as a side effect of the operations you’re performing.


iPhone 3GS: Lifting its firmware to iOS 4.0

iOS 4.0Recently, I had a chance to upgrade my iPhone 3GS OS to the new and latest iOS 4.0.1 and my experience with this new firmware is quite impressive and enjoyable on my part.

At first, I just plan an upgrade but opted a fresh clean install of the firmware so I choose the Restore facility available on the iTunes. So the iTunes downloaded first the firmware before proceeding to the actual installation of the new firmware. During restoration, I did encounter a problem during iPhone Software Restore stage, it just stops about 98% and the progress bar on my device was not moving. So during this state, I research Apple documentation for a possible solution but the only solution I got is that I should repeat the process again because the device will automatically enter in the DFU mode. I did try the restoration process for about 3 times but still no luck using my MacBook Pro. Luckily, I still have another machine, a Windows 7 machine for me to restore my iPhone 3GS, so I repeat the process of downloading the iOS 4.0.1 on the windows machine and surprisingly, the installation went smoothly with no errors whatsoever! This time, my windows box saved my day!

iOS 4 Observation and Experiences

Feeling excited about this new iOS 4 on my 3GS, I explore the new features that made this new firmware awesome and cool!

These are the items I just noticed and experience that has an impact to my day to day usage:

Multitasking
This feature is rock solid! Now all my iOS 4 native applications installed on the device can now run in the background and updates itself when presented again in the foreground. Twitter and Facebook for example employs the multitasking feature. And also, Soosiz, a platformer game which is one of my daughter’s favorite already updated to be iOS 4 native!

Safari Address completion
Though, this is a minor one but still a really nice update. Now, if you’re typing a website on the address bar, the dropdown list of all currently cached sites will be displayed in a Website Name + URL context which in turn makes it easy for users to know what name the URL is he/she visiting. This feature is not found on my iPhone 3GS.

Location Services
With iOS 4, the user now knows what applications are using the GPS functionality and you now have the ability to turn off GPS function on a per application basis. This can be done via the Settings Menu/General/Location Services. Before, the only way to refresh the GPS Permission popup, you will need to reset the Location Warnings and open the GPS-aware application again to prompt the GSP Warning message.

And its good to note that the GPS functionality sports a new icon placed before your battery information on the upper right of the screen which basically notify you that your currently opened app is permitted to use your GPS information.

Spotlight Search
With 3GS, spotlight search will basically crawl all data available to your device, be it Email, SMS, Contacts, Applications, etc. Now, we can actually filter out sections that the Spotlight will search for an item. And this settings is located under your Settings/General/Spotlight Search

Message Counter
This feature is already available to a jailbroken iPhone via an app download to the Cydia repository. And i think that Apple sees that this little feature will be very very useful in order for user to know the actual SMS count (because money counts if you’re a prepaid subscriber!).

But this setting is turned off by default, to enable message counter, you just need to go in Settings / Messages and swipe the Character Count to On.

Background
I’m not fond of changing wallpaper to my device, I am always contented with simple and defaulted background of the device. But with this addition, the user can now set/change the homescreen and springboard background image as a separate or as same for both. With me playing around with this, I find all the default installed backgrounds to be simple and nicely done effect that is very very elegant to view together with icons.

Threaded Mail + Picture
Yes, at last, I don’t have to scroll down and down to a single threaded message to actually read the previous conversation! With this feature, the front view of your inbox will have a number badge if the message is threaded and when opening a threaded email, it will list all messages as a separate cell allowing you to choose which one do you like to read and scroll thru the bottom to read just for that specific message! Very clever and great feature!

Not only this, if you open an email whose sender is part of your contact (provided that you include the contacts’ email address) and your contact has a photo, it will automatically display the photo of your currently selected sender. So while reading his/her message, you have a visual of who’s sending you so that you can read the message with feelings or not! =)

Folders
I know that many people is expecting this feature so I will not talk about much about it. All I can say that they done a great job in implementing Folders to categorize your applications. Apple did a clever job in identifying the initial name of the folder if you first try to drag the application to another app. For most of my folders, Apple’s suggestion is always my first choice!

And what’s nice about the Folders is when you try to download an upgrade for your app that is inside your folder, Apple nicely displays the progress bar INSIDE your folder and not in the folder itself! How cool is that!

Camera Zoom + Speed
This feature is greatly improved with regards to the speed in taking a shot. Before, if you take a single shot, it will have a shutter delay for about a minute but now, the shutter will close at a blink of my eye and the image is saved instantly!

And with camera zooming now integrated to the Camera app, I don’t think I will be purchasing an app that have the same functionality.

Notes / Calendar
Now, this native apps have a syncing capability to your email account like Gmail. Like for instance, in the Notes app, if you create a New Note under your email, it will automatically sync to your GMail and you will see it in real time as a new section called Note. Same goes for your Calendar!

These changes will soon be updated to allow a 2-way syncing of items. I hope so. 🙂

Photos
I am a Mac user currently using Snow Leopard OS and loving the iLife 09 especially the Photo application which basically let me tag images with Faces and Places.

With iOS 4, this is now possible! Well, at least for the Places part :). Before, I am taking shots and not knowing instantly the location the photo is taken, I have to sync it first to my MacBook and let the iPhoto do the geo-tagging. But now, it’s already built-in and part of the Photo app on my iPhone. The app now has a 2 tabs, Photos and Places which will do the geo-tagging for me to all available photos I have that has a geo tag information embedded on it.

So far, with the new features and functionalities this new iOS 4 introduces to the users, I am very happy with all of the new and updated changes!

So, if you own an iPhone 3GS, iOS 4 is definitely a must try!
Fixing GPS (Stops Working) Issue on iPhone 3GS

While working and debugging my XCode project that involves reading of Users’ Current Location (GPS), I just noticed that when I run the application on to my Device (iPhone 3GS 3.1.2), it didn’t ask for permission to Allow Current Location. and I thought I was doing something wrong with my code. So I looked back and tried running it on iPhone Simulator, the code works and it did catch the defaulted Current Location on the Simulator. Then I restarted my device to make sure everything is on the init state. I opened the Compass application, and it read 0 degress N and the Locate button on the lower left is disabled!

With this encounter on my device, I started other applications installed on my phone that accesses my GPS and none of them worked! Naturally, I suspected that my iPhones’ GPS suddenly died on me. Through this, I started firing up Firefox and start googling looking for someone who has the same case bout me and a solution for the problem.

Solution #1: Resetting Network Settings
It said that by resetting the Network Settings on my iPhone will fix the issue. So I reset my settings through Settings/General/Reset/Reset Network Settings and my device restarted itself.

This solution didn’t worked for me but it did work on most iPhone 3G models.

I keep on searching and found the most reliable solution that involves opening an SSH on my device. So, I’m sharing what I did below:

Solution #2: Issuing commands on SSH Terminal
This solution will only work on a Jailbroken iPhone as it needs to be able to connect via SSH.

1. Connect to SSH by using Putty on Windows.
2. Login as root (default password is alpine)
3. Type killall –9 locationd and press Enter. This will signal to kill a process called locationd (the daemon that GPS use).
4. Type rm -rf /var/root/Library/Caches/locationd .This will remove all available cache under the locationd directory which in this case is the cache.plist. You can also delete just the cache.plist if you like.
5.  Open up Compass application again the the alert popup will display asking for a permission to use your Current Location.

Solution #2 accurately fixed my GPS issue and I didn’t even need to restore my iPhone from my backup! This approach saved my day and I recommend doing the same thing if the problem will occur on your precious iPhone 3GS.